We've been getting so many requests on how to do a pull-through braid. While we've shown the technique in another video tutorial, many of you wanted to know how to do it in the back of your head instead of on the side.
So we collaborated with our talented friend Alex Gaboury to show you exactly how to do a pull-through braid — that gorgeous, voluminous braid that gives the illusion of thicker, fuller hair. Watch the full video below, or scroll down for step-by-step written instructions.
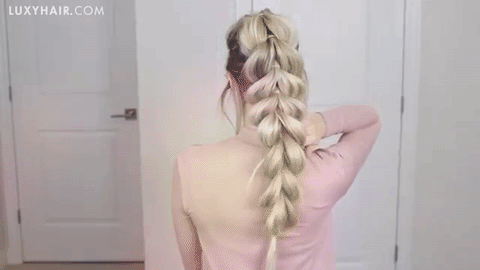
Watch: How to Do a Pull-Through Braid (Full Video Tutorial)
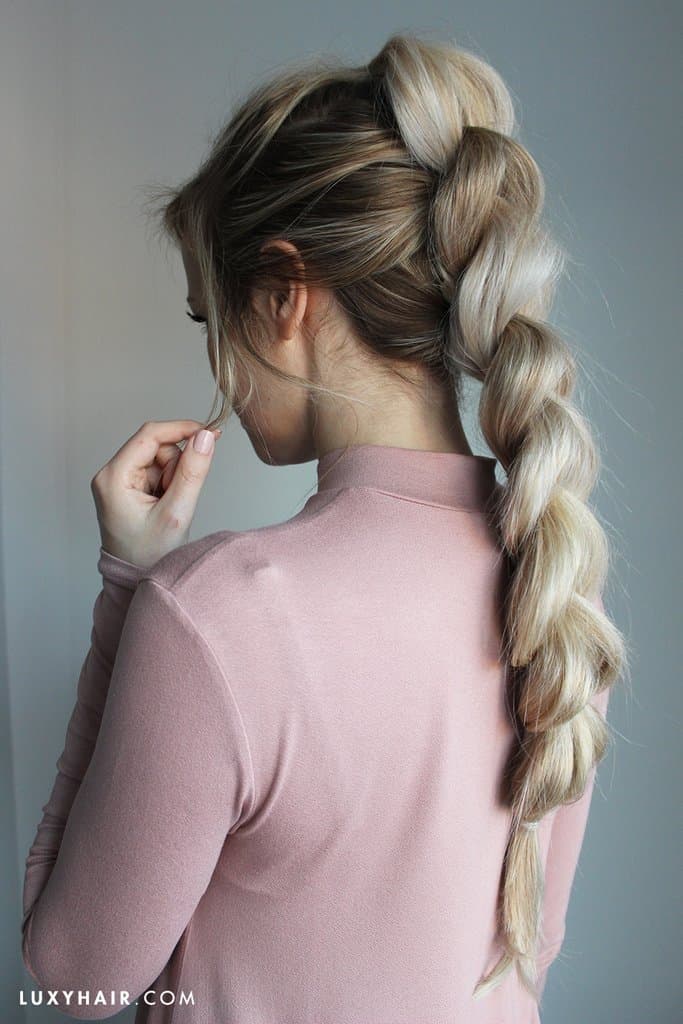
Alex is wearing wefts of her Ash Blonde Luxy Hair extensions to add volume and really bring out the fullness of this braid.
The secret to a fuller pull-through braid? A few extra wefts.
Alex clips in just 4–5 wefts from her Luxy Hair Seamless Clip-In Extensions to transform a flat everyday braid into a thick, voluminous statement look. No commitment. No salon.
Shop Seamless Clip-Ins →What You'll Need
-
✓8–10 clear elastics (amount depends on hair length)
-
✓1 large clip to hold sections out of the way
-
✓4–5 small wefts of clip-in extensions (four 1-clip wefts + one 2-clip weft works well). For the 1-clip wefts, clip each one onto itself to make it smaller so it fits neatly under each ponytail.
-
✓Optional: A 1-inch curling barrel to add soft curls to the face-framing pieces at the end
How to Do a Pull-Through Braid: Step-by-Step
-
1Gather the hair at the crown of your head into your first ponytail. Leave a few face-framing pieces out at the front if you like. Flip the ponytail up and out of the way, then clip a 1-clip weft upside down on the underside of this section. Gather everything back into the ponytail and secure with a clear elastic. Clip this ponytail up on top of your head.
-
2Starting just below your temples, gather a second section of hair below your first ponytail. Flip it up, clip two 1-clip wefts upside down on the underside for added fullness, then secure with a clear elastic. Clip this section up on top of your head as well.
-
3Unclip the first ponytail and split it down the middle into two equal sections. Drape one over each shoulder to keep them out of the way — these become part of your next section.
-
4Starting at about mid-ear level, gather your third section — including the two split pieces from the first ponytail. Position it just below your second ponytail. Flip up, clip a 1-clip weft upside down underneath, and secure with an elastic. You'll now see your first pull-through taking shape. Clip this section up on top of your head.
-
5Unclip the second ponytail and split it into two equal sections, placing them over each shoulder as before.
-
6For the next section, clip your 2-clip weft normally in the middle of where your next ponytail will sit — this adds extra volume and length. Gather all remaining hair (including the two split pieces from the second ponytail) and secure with an elastic. Clip up and out of the way.
-
7Continue repeating the pattern — split the previous ponytail into two, drape over shoulders, gather next section around them, clip in a weft, secure — all the way down. Once your arms get tired, pull everything over your shoulder to continue more comfortably.
-
8Once you've reached the ends, secure everything with one final elastic.
-
9Starting at the top of the braid, use your index finger and thumb to gently tug the sides of each pull-through outward, making the braid look fuller and chunkier. Work in small sections — it's easier to go bigger than to pull it back. Take your time here, this is what transforms the braid.
-
10Optional: Use a 1-inch curling barrel to curl the face-framing pieces away from your face for a softer, more romantic finish.

Love braids? Try these next.
How to Fishtail Braid: Step-by-Step Tutorial → How to Do a Dutch Braid: Tutorial for Beginners → Dutch French Side Braid Tutorial → 8 Super Quick & Easy 2-Minute Hairstyles → 10 Super Easy Back to School Hairstyles →This braid works equally well worn casually for a daytime look, or sleek and polished for a date night. Once you've recreated it, tag us on Instagram @luxyhair — we'd love to see yours!