It’s when you can’t go out to get your haircut that you really begin to appreciate your hairstylist. Let’s be honest—even once we are able to leave our homes after quarantine is over, chances are that it will be pretty difficult to get a coveted appointment at hair or nail salons.
The good news is that, just like you can bring the nail salon home with you, you can bring your hair salon home too. If you think your hair is getting a little rough around the edges, consider trying your hand at a home haircut.
We’ve consulted with our resident hair stylist specialist Dee Lewis to figure out the best way to cut different styles of hair in the comfort of our own homes. And guess what? If you mess up, there's hair extensions for that.

Before cutting your own hair, ask yourself the following:
Is it time to cut your hair, or can you wait?
If you can wait to cut your hair, you may be better off waiting for a salon to open— but how do you know if you can wait or not? Here are some tell tale signs that you may be overdue for a haircut.
“If the ends of your hairs are splitting in a million directions ( or even just 2) or you see little white bits at the ends, it needs a clean up,” Dee says. "When the hair starts to break or split it will keep travelling further and further up the hair shaft creating breakage higher up in the hair, or causing you to get a bigger “trim” than you expected!”

Dee also suggests avoiding any major hairstyle changes because “you will most likely end up worse than you started.”
If you are going to give yourself a home hair cut, stick to simple trims of anything 1 inch or less of the length of your hair. This kind of subtle cut won’t make a drastic difference, so if you mess up, you won’t notice it as much. It’ll also be easier to salvage down the road.
Maybe try a hair mask instead
If your hair is pretty healthy, or just slightly dry on the ends, try a hair mask at home first before committing to a home haircut.
Use salon quality hair masks, or masks with keratin, fatty acids, or vinegar. Because vinegar is acidic, it can be used to help lower the pH of the hair. This will tighten the cuticle, which "makes hair look shiny, and seals split ends," says Dee.

How to cut your own hair
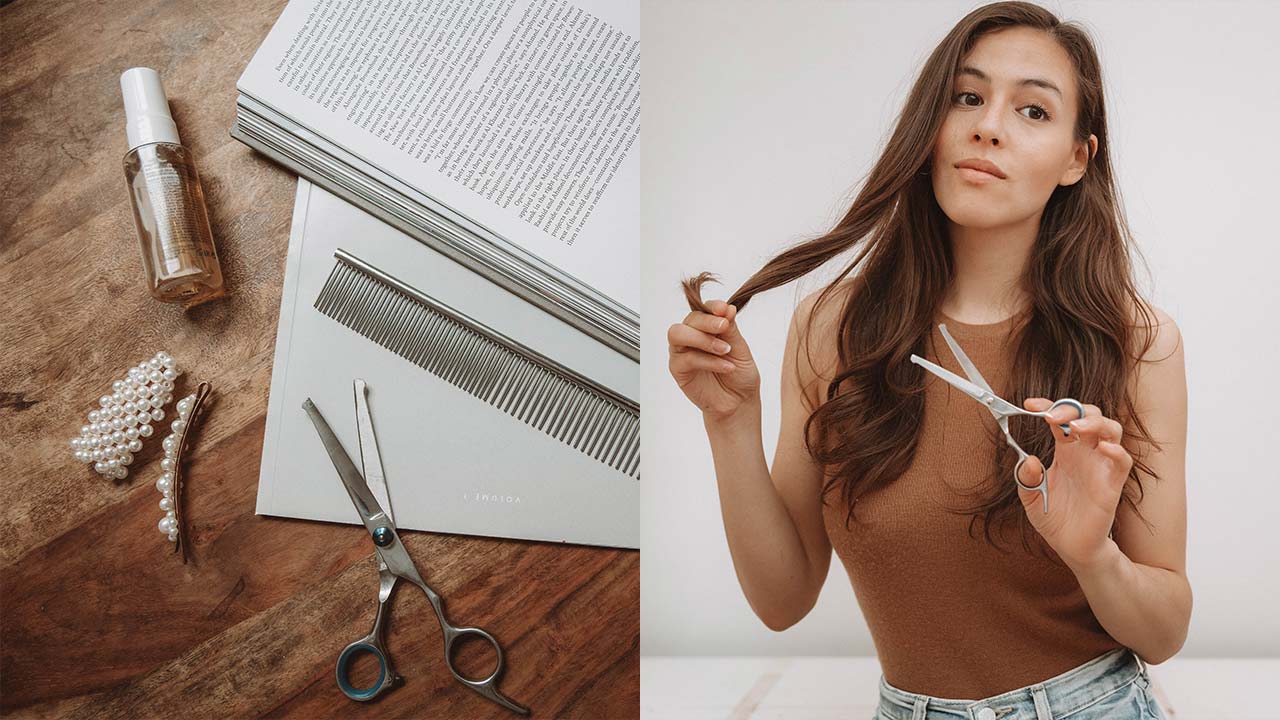
Tools you will need
Here's what you will need:
- Sharp scissors - be sure to use the sharpest scissors you can find. Better yet, hair dressing scissors. Your kitchen shears will not be acceptable for this!
- A long comb that is not too fine
- Broom/ dust pan
- A blowdryer
- 2 hair clips
Step 1: find an open space
Clear a space to cut your hair where it’s not falling onto a counter or into the sink or shower drain. It's much easier to just sweep up off the floor than trying to get it out of the sink and off the counter.
Step 2: dry your hair completely

Before you cut your hair, it’s important to dry your hair completely.
“When the hair is dry, it has slightly more volume,” Dee explains. This way, when you cut, you will see exactly where the hair will sit. If you cut your hair wet, however, once it dries and bounces up, you may find that you ended up cutting off more than expected. This especially rings true for bangs!
Dee explains that the best way to dry your hair if you have straight or wavy hair is to blow dry your locks smooth. For curly hair, however, she suggests to let your hair air dry naturally, or however you usually style it. She advises that once it is totally dry and you determine how much hair you are going to cut, to cut half of that.
“It will spring up more than you want, and you will end up with a 2 inch haircut when you were only trying to cut 1 inch," she explains.
Step 3: the basics of hair cutting

When deciding on how much to cut, always cut less than what you think you need to cut off. Dee suggests trying to cut a small piece first to see if the length is as you like. Then, use that as a guide when cutting the rest of your hair. Go slowly, adding small sections to the guide until all your hair is cut.
How to cut your own hair in layers
If you are going to layer your hair, proceed with caution. Dee suggests not trying to cut your layers yourself, and only making subtle tweaks.
1. Overdirecting
At most, if you notice splits in your layers, part your hair normally, then split the hair in half down the back bringing it forward over your shoulders. This is called over directing.
“When your hair is brought forward and you cut the ends, you will naturally create that slight U shape when it falls back,” Dee explains. “The hair is wrapping forward leaving length when put back into place. That should help create a softer feel through the perimeter.”

2. The horseshoe part
If you do decide to cut your layers though, a general rule of thumb is the higher the lift, the softer the feel. To do this, start by creating a horseshoe section from temple to temple and around the back of your crown, at the widest part of your head.
The area closest to the back of the head/horseshoe should be where the longest length stays and nearer to your face is where it can be slightly shorter.
Brush all the hair straight up (if some falls away leave it) and angle the hair up so it creates a straight line from your face to the tips of your hair. Slide your fingers to the very tips where you see the breakage bits and or where you can see right through the hair.
"If this is a lot of hair, don’t cut it—it should only be about 1 inch or less," advises Dee.
3. Point cutting
Once it's safe to cut, point your scissors at your hair to create a point cutting effect.
When point cutting, open your scissors as you place them in your hair ends, and only close them as you are sliding away. "This is the best way to avoid cutting your fingers or creating a hole in the hair,” says Dee. Point cutting is also an easy way to hide any mistakes and soften the finish.
You can apply the point cutting technique to the lengths/perimeter of your hair and to soften a blunt cut.

Getting rid of split ends
You may find that your length is just fine, and that you just want to get rid of split ends. Fortunately, this is pretty easy! Before you even cut your ends however, try a vinegar treatment to help seal them first.
When cutting, bring your hair forward, and part where you usually do. Then, bring your hair forward over your shoulders, and cut slightly less than you think you need to. Make sure to check that the length is the same on both sides. This is also a good strategy to use to make sure you cut your locks all one length when you are giving yourself a trim.
When you are cutting your split ends, Dee says to make sure you keep your chin up. “Look in the mirror and do not look down. You will angle your hair down and end up taking off too much length by accident!”

How to cut face framing layers
To cut trendy face framing layers, first start with your regular part, then a vertical section down to the front of your ears.
Dee suggests to comb this section inch by inch over directing forward at about 40 degrees. “The bottom of your first inch section shouldn't lift higher than the corner of your eye or cheekbone.
Next, slide your fingers down keeping your fingers straight, not angled, as the hair sticking out should now be at a slight angle. Point cut a little at a time. For guidance, follow the shape originally created by your hairstylist.

How to cut the back of your hair
Cutting the back of your hair may seem like a struggle, but it doesn’t have to be. Dee suggests that to cut the back of your hair, always angle the hair forward. “It is a more natural look to have the hair slightly shorter in the front than the back and the over direction will create this. This will also help you to see the front and what you are cutting so that you can ensure that you have an even and balanced cut.
How to cut curly & wavy hair
The reality is that everyone has a different hair type, so take this into consideration before you start cutting.
Curly hair is a unique (and fabulous) texture that cuts slightly differently. Fortunately, our specialist Dee has taught us how to cut our curly locks without having to leave the house (at least for the time being.)
For curly hair, first air dry your hair. Then, style to your desired shape and cut only what seems to be out of place. According to Dee, if you have curly hair, always cut half of what you planned to cut.
“1 inch will look like 2 inches, because with curls and waves, the shorter that hair the stronger the curl.”
How to cut your own bangs
Now, this may not be the best time to start experimenting if you don’t already have bangs. That said, if you are just going to do it anyways, or have bangs to maintain, Dee does have some helpful tips.
If you do not have bangs, this may not be the best time to try to give yourself some. Instead, experiment with with clip in bangs and decide if you want to make the style permanent once you can see a professional hair stylist.
If you already have bangs and want to maintain them during this time—or are feeling daring and want to cut your own bangs—here’s how to cut your own bangs at home.
Disclaimer: proceed with caution!

Step 1: Blow dry your bangs
Blow dry your bangs and style them as you usually would. Part your hair down the centre, and then create a triangle that is 1 ½ inches back from the hairline with the sides angled to meet at your pupils/centre of your eye.
“This may seem like a small section, but it will fan out fuller once cut and styled and you can always add more later,” Dee explains.
Step 2: Clip your hair back
Clip all the rest of your hair away so you can focus on your bangs.
Step 3: Start in the centre of your triangle
Start with a 1/4 inch section in the centre of your triangle. Comb this down using a wide tooth comb with very little tension and find where you want the length to hit. This is going to be your guide.
"Cut less than you think, because you can always cut more," Dee warns.
Step 4: Keep your chin up
If you’re looking down, you are more likely to cut too much length. If you cut too much, add a tiny bit of hair from each side off the centre and cut slightly longer where you want it. You can “curtain” your bangs to hide the mistake in the middle.
Step 5: Split hair in the centre
Split your hair in the centre once you have found the desired length and have moved to the next side. Add another 1/4 inch section to the “guide” from either side.
“Keeping the hair you have already cut straight down in the centre and over direct the new section to meet the guide,” Dee says. Then, cut the new section to the length of your guide.
Step 6: Cut straight down in the centre
“If you are trying to create a more curtain or angled fringe,” Dee says, “work side to side, over directing from your centre part. Have your guide pointing at the opposite pupil or centre of eye and bringing each added section over to meet your guide. Then, cut the added sections to the length of your guide.
Step 7: Adjust
Once all hair is cut, you should have your desired fringe. “If it feels too narrow,” Dee suggests, “make your triangle slightly bigger and add more hair 1/4 inch at a time!”

Dos and don'ts of cutting your own hair at home
-
Use the sharpest scissors you own.
-
Use a comb that is not a super fine tooth. A slightly wider helps to give less tension so you don't end up with an uneven cut.
-
Do not try to use clippers like the pros do to cut your length, it cuts fast and a lot of hair at once.
-
Don’t cut over a carpet, or in an area you do not want little bits of hair flying around, hair tends to get everywhere!
-
Always cut half of what you plan to cut, and go shorter in increments if need be.
- Although we have provided instructions, it is best to leave layers and bangs cutting to the pros.
Have any more questions on how to cut your own hair? Drop them in the comments below, and we'll be happy to help.
Written by: Brittany Rodriguez