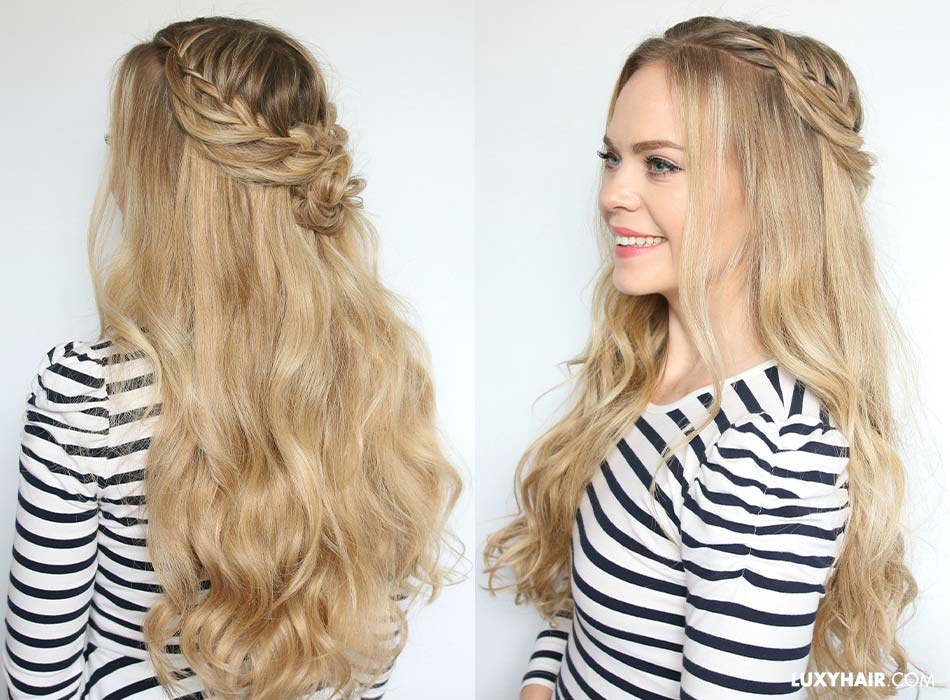
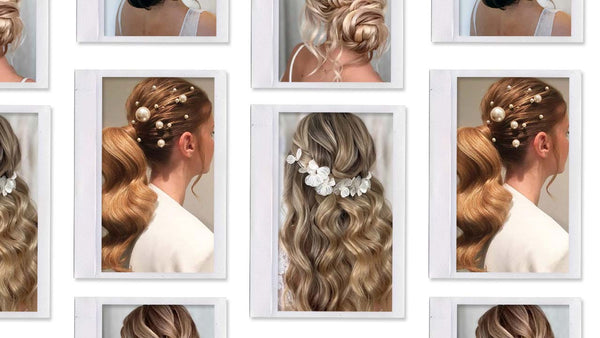
In this week's tutorial, our beautiful friend Missy Sue will show you how to create this super pretty Half-Up Flower Bun hairstyle. It's perfect for Prom, if you're attending a party, wedding, or any occasion when you feel like doing something extra special with your hair!
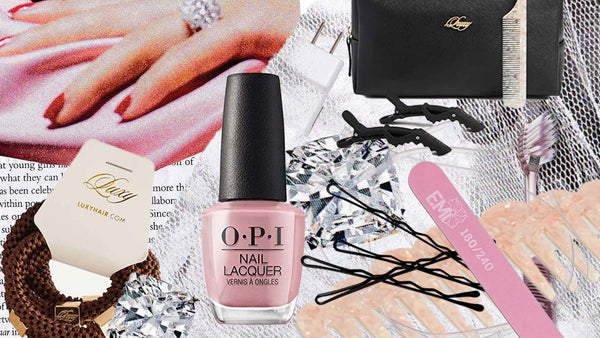
Missy wears her 220g Dirty Blonde Luxy Hair extensions for extra length and volume in her hair.
Hey, it's Missy, and welcome back to the Luxy channel. I'm so excited to be collaborating with Luxy Hair today. I also have a YouTube channel called Missy Sue, and I just posted a tutorial about how to clip in your Luxies based on different types of hairstyles, so be sure to check it out. I think you're really gonna love it. I'll leave a link in the description box below.
For this tutorial, I'll be showing you how to recreate this half-up style with two looped braids that meet together at the back in a cute little bun. I think this style is so pretty, and I have featured this same braiding technique on my own channel, but I wanted to change it up into a cute half-up style, and the little bun at the back reminds me of a little flower which is right on trend for spring. So if you wanna see how to recreate this look, then just keep watching.
For this hairstyle, I'm prepping the hair by curling it in sections with a one-inch curling iron. And I'm alternating the direction of the curls, so some pieces are curled towards my face, and other pieces are curled away from the face so that the curls don't stick together. Once it's all curled, then I'm grabbing my Luxy Hair extensions. This is the Dirty Blonde set that is 20 inches long and 220 grams, and I love these extensions because they match my hair perfectly. And I love how they add a couple of extra inches to my length while also making my hair more thick and full.
And I went ahead and curled the extensions, since my hair is curled as well for this tutorial. Each set comes with 10 wefts, and I'm gonna start by dividing my hair at the top of the ears, and clipping in the two-clip wefts. So I'm going to clip in one, and then clip the second one in right on top of it. Then I let down the hair and divide up a new layer of hair, and then I clip in the wefts that have three clips on them. So I clip in one, and then I clip the second one right on top. And I like to bricklayer the extensions, so that they're a little bit staggered. Then I let the hair down, and divide up a new layer. And now I'm clipping in the four-clip wefts. And again, I'm going to clip in one, and then layer the second one right on top.
Now for the single weft extensions, I'm going to divide off a layer of hair on the left and right side of the head, a few inches above the ears, and clip two next to each other, to add a little bit of length and fullness on the sides. Here is how the hair looks with all of the extensions clipped in. You can see it's a lot more thick and luscious than before, and creates the perfect base for any hairstyle. Now that the hair is ready, let's move right into the hairstyle. With the centre part, clip up the hair on the right side so we can work with the hair on the left. Divide up a triangle-shaped section, leaving down any hair you want to frame your face. Then take a small piece near the part and we're going to use this for the braid.
Divide this section into three smaller sections. Take the strand on the right, cross it over the middle, then take the strand on the left, crossing it over the middle. Cross the strand on the right over the middle, and bring in a new section of hair. Take the strand on the left, cross it over the middle and bring in a section of hair. Then cross the strand on the right over the middle and bring in a section of hair. Now take the strand on the left, and normally this would go over the middle. But instead we're going to create a waterfall piece, so we're going to drop it down and then reach underneath it and pick up a new section of hair, crossing it over the middle and bringing it into the braid.
Now take the right strand, cross it over the middle and pick up a new section, so that this side of the braid is the same as before. Then take the strand on the left, and again we're going to drop it down, creating a second waterfall piece. Then reach underneath it and pick up a new section of hair, crossing it over the middle and bringing it into the braid. Take the strand on the right, cross it over the middle, and bring in a new section. Then take the strand on the left, drop it down, reach behind it, pick up a new section, crossing it over the middle and bringing it into the braid. Then we're going to do this one more time so that we have four waterfall pieces hanging down. Drop down the fourth waterfall piece and bring in a new section. And now that there are four pieces hanging down, we're going to pick up the first one and bring it into the braid to create the first loop.
Now cross the right strand over the middle and bring in a new section. Take the strand on the left, dropping it down, reach behind it, and bring a new section into the braid. Pick up the next waterfall strand and bring it into the braid as well, creating the second loop. So cross the right strand over the middle, and bring in a section. Drop down the left strand and pick up a section behind it, adding it into the braid. Then pick up the third waterfall strand, bringing it into the braid as well, to create the third loop. Once there are three loops, then stop dropping waterfall strands and just start bringing them into the braid. So cross the right over the middle, then the left, and bring in the waterfall strand. Cross the right over the middle, then the left, and bring in the next waterfall strand, and just continue the braid until all of the waterfall pieces are brought in.
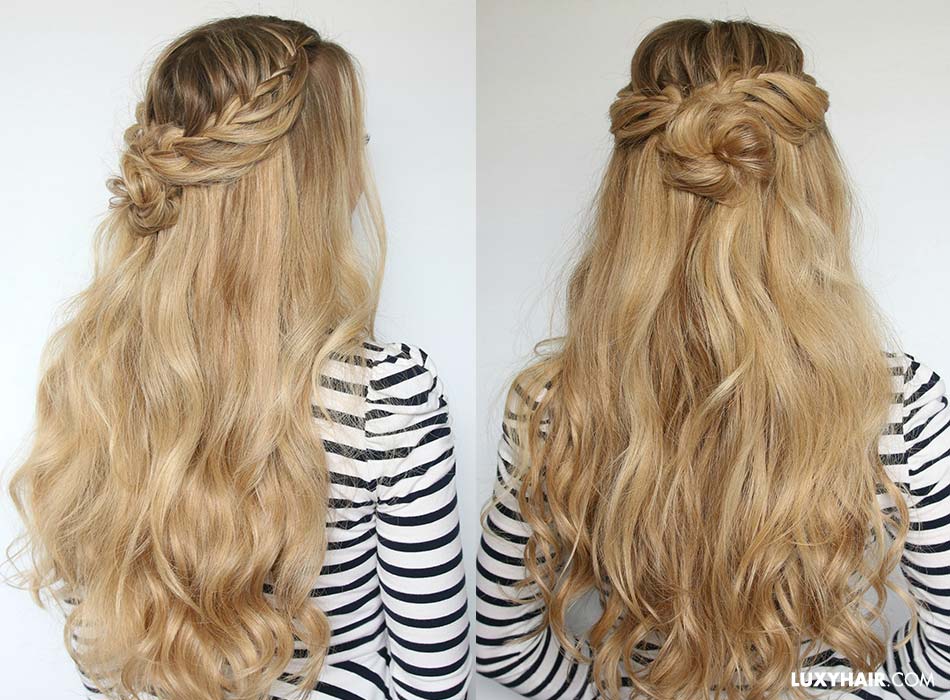
Then braid the rest of the section to the bottom, grab a teasing comb and gently backcomb the ends so that the braid doesn't unravel. Once that section is braided, then let down the hair on the right side and repeat the exact same steps creating a second looped braid. Now we're going to pin the braids at the back, so take the braid on the right side and wrap it around the back of the head. And if you have any pieces that are sticking up you can always tuck them back into the braid to lay them flat. Grab some bobby pins and pin down the braid. Then take the braid on the left side and criss-cross it over the other braid, pinning it down as well, and gently unravel the ends of the braids. Pick up a small section of hair at the centre of the back of the head, and we're going to use this to create the little bun.
So twist it all together, then wrap the section clockwise creating a space in the middle. Take the ends and pull it through the middle to create a little knot, and pin down the edges with a few bobby pins. Take the ends that are sticking out from the middle, wrap them clockwise around the bun, secure it in place with more bobby pins, and that is the last step.
Thank you for watching, I hope you enjoyed this tutorial. I think this hairstyle is so pretty, and perfect for school, or work, the weekend, a party, really anywhere where you wanna look a little extra cute. So if you decide to recreate this hairstyle then make sure to hashtag #Luxyhair so we can see your recreation, and be sure to check out my other video on my channel, where I show you how to clip in your extensions based on different hairstyles. And I hope you have a fabulous week. Bye.
Watch the tutorial now and give this hairstyle a try! Be sure to tag your recreations on Instagram with #luxyhair - we'd love to see, and always feature our favorites :)
What kinds of tutorials do you want to see more of on our YouTube channel? Braids? Up-dos? Hair hacks? Let us know!